
Scene blockchain operations
❗Warning: This is a legacy page covering functionality with the old SDK version 6. See the latest version of this topic here .
A Decentraland scene can interface with the Ethereum blockchain. This can serve to obtain data about the user’s wallet and the tokens in it, or to trigger transactions that could involve any Ethereum token, fungible or non-fungible. This can be used in many ways, for example to sell tokens, to reward tokens as part of a game-mechanic, to change how a player interacts with a scene if they own certain tokens, etc.
The following tools currently exist, all of them provided by Decentraland:
- The
Ethereum controller: A basic library that offers some limited but simple functionality. - The
eth-connectlibrary: A lower level library to interface with Ethereum contracts and call their functions, for example to trigger transactions or check balances.
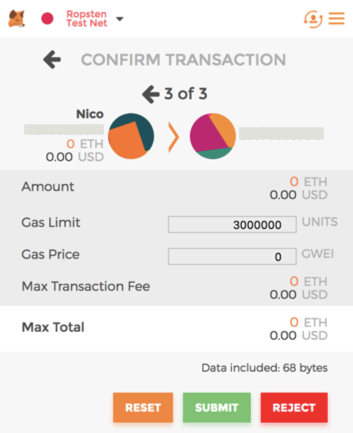
Note that all transactions triggered by a scene will require a player to approve and pay a gas fee.
All blockchain operations also need to be carried out as asynchronous functions , since the timing depends on external events.
When running a preview of a scene that uses one of the ethereum libraries, you must have Metamask open in your browser. If using the CLI, run the preview with:
dcl start --web3
If using the Decentraland Editor, open the scene in a separate browser window, and manually include the string &ENABLE_WEB3.
Ethereum controller library #
The simplest way to perform operations on the Ethereum blockchain is through the ethereum controller library. This controller is packaged with the SDK, so you don’t need to run any manual installations.
To import the Ethereum controller into your scene file:
import * as EthereumController from '@decentraland/EthereumController'
Below we explain some of the things you can do with this controller.
Get a player’s ethereum account #
Use the getUserAccount() function from the EthereumController to find a player’s Ethereum public key.
import { getUserAccount } from '@decentraland/EthereumController'

executeTask(async () => {
	try {
		const address = await getUserAccount()
		log(address)
	} catch (error) {
		log(error.toString())
	}
})
As shown in the example above, you should wrap the function in an async() function, learn more about this in
async functions
The following example keeps track of provided addresses.
import { getUserAccount } from '@decentraland/EthereumController'

let registeredAddresses: String[] = []

executeTask(async () => {
	try {
		const address = await getUserAccount()
		let lowerCaseAddress = address.toLowerCase()
		for (let i = 0; i < registeredAddresses.length; i++) {
			if (lowerCaseAddress == registeredAddresses[i]) {
				log('already registered')
			} else {
				registeredAddresses.push(lowerCaseAddress)
			}
		}
	} catch (error) {
		log(error.toString())
	}
})
📔 Note: Even though the eth address may contain upper case characters, some browsers convert the returned string to lower case automatically. If you wish compare address values and have it work on all browsers, use the .toLowerCase() method to convert the value into lower case.
Sign messages #
A player can sign a message using their Ethereum private key. This signature is a secure way to give consent or to register an accomplishment or action that is registered with the block chain. The message can be verified with the player’s public key.
The signing of a message isn’t a transaction, so it doesn’t imply paying any gas fees on the Ethereum network, it does however open a pop-up to ask the player for consent.
Messages that can be signed need to follow a specific format to match safety requirements. They must include the “Decentraland signed header” at the top, this prevents the possibility of any mismanagement of the player’s wallet.
Signable messages should follow this format:
# DCL Signed message
<key 1>: <value 1>
<key 2>: <value 2>
<key n>: <value n>
Timestamp: <time stamp>
For example, a signable message for a game might look like this:
# DCL Signed message
Attacker: 10
Defender: 123
Timestamp: 1512345678
Before a player can sign a message, you must first convert it from a string into an object using the convertMessageToObject() function, then it can be signed with the signMessage() function.
import * as EthereumController from '@decentraland/EthereumController'

const messageToSign = `# DCL Signed message
Attacker: 10
Defender: 123
Timestamp: 1512345678`

let eth = EthereumController

executeTask(async () => {
	const convertedMessage = await eth.convertMessageToObject(messageToSign)
	const { message, signature } = await eth.signMessage(convertedMessage)
	log({ message, signature })
})
Check if a message is correct #
To verify that the message that the player signed is in fact the one that you want to send, you can use the toHex() function from eth-connect library, to convert it and easily compare it. See further below for instructions on how to import the eth-connect library.
import { toHex } from 'eth-connect'
import * as EthereumController from '@decentraland/EthereumController'

const messageToSign = `# DCL Signed message
Attacker: 10
Defender: 123
Timestamp: 1512345678`

let eth = EthereumController

function signMessage(msg: string) {
	executeTask(async () => {
		const convertedMessage = await eth.convertMessageToObject(msg)
		const { message, signature } = await eth.signMessage(convertedMessage)
		log({ message, signature })

		const originalMessageHex = await toHex(msg)
		const sentMessageHex = await toHex(message)
		const isEqual = sentMessageHex === originalMessageHex
		log('Is the message correct?', isEqual)
	})
}

signMessage(messageToSign)
Require a payment #
The requirePayment() function prompts the player to accept paying a sum to an Ethereum wallet of your choice.
Players must always accept payments manually, a payment can never be implied directly from the player’s actions in the scene.
eth.requirePayment(receivingAddress, amount, currency)
The function requires that you specify an Ethereum wallet address to receive the payment, an amount for the transaction and a specific currency to use (for now only ETH is supported).
If accepted by the player, the function returns the hash number of the transaction.
❗Warning
This function informs you that a transaction was requested, but not that it was confirmed. If the gas price is too low, or it doesn’t get mined for any reason, the transaction won’t be completed.
const myWallet = ‘0x0123456789...’
const enterPrice = 0.05

function payment(){
  executeTask(async () => {
    try {
      await eth.requirePayment(myWallet, enterPrice, 'ETH')
      openDoor()
    } catch {
      log("failed process payment")
    }
  })
}

const button = new Entity()
button.addComponent(new BoxShape())
button.addComponent(new OnClick( e => {
    payment()
  }))
engine.addEntity(button)
The example above listens for clicks on a button entity. When clicked, the player is prompted to make a payment in ETH to a specific wallet for a given amount. Once the player accepts this payment, the rest of the function can be executed. If the player doesn’t accept the payment, the rest of the function won’t be executed.
💡 Tip: We recommend defining the wallet address and the amount to pay as global constants at the start of the .ts file. These are values you might need to change in the future, setting them as constants makes it easier to update the code.
Lower level operations #
The eth-connect library is made and maintained by Decentraland. It’s based on the popular Web3.js library, but it’s fully written in TypeScript and features a few security improvements.
This controller operates at a lower level than the Ethereum controller (in fact the Ethereum controller is built upon it) so it’s tougher to use but more flexible.
It’s main use is to call functions in a contract, it also offers a number of helper functions for various tasks. Check it out on GitHub .
📔 Note: The eth-connect library is currently lacking more in-depth documentation. Since this library is mostly based on the Web3.js library and most of the function names are intentionally kept identical to those in Web3.js, it can often help to refer to Web3’s documentation .
Download and import the eth-connect library #
To use eth-connect library, you must manually install the package via npm in your scene’s folder. To do so, run the following command in the scene folder:
npm install eth-connect -B
📔 Note: Decentraland scenes don’t support older versions than 4.0 of the eth-connect library.
Currently, we don’t allow installing other dependencies via npm that are not created by Decentraland. This is to keep scenes well sandboxed and prevent malicious code.
Once installed, you can import whatever you need from eth-connect to the scene’s code:
import { toHex } from 'eth-connect'
Import a contract ABI #
An ABI (Application Binary Interface) describes how to interact with an Ethereum contract, determining what functions are available, what inputs they take and what they output. Each Ethereum contract has its own ABI, you should import the ABIs of all the contracts you wish to use in your project.
For example, here’s an example of one function in the MANA ABI:
{
  anonymous: false,
  inputs: [
    {
      indexed: true,
      name: 'burner',
      type: 'address'
    },
    {
      indexed: false,
      name: 'value',
      type: 'uint256'
    }
  ],
  name: 'Burn',
  type: 'event'
}
ABI definitions can be quite lengthy, as they often include a lot of functions, so we recommend pasting the JSON contents of an ABI file into a separate .ts file and importing it into other scene files from there. We also recommend holding all ABI files in a separate folder of your scene, named /contracts.
import { abi } from '../contracts/mana'
Here are links to different Decentraland contracts. Obtain the ABI for each contract by clicking Export ABI and choosing JSON Format.
These are the contracts for the various wearable collections: (each collection was emitted as a separate contract)
- ExclusiveMasksCollection ABI
- Halloween2019Collection ABI
- Halloween2019CollectionFactory ABI
- Xmas2019Collection ABI
- MCHCollection ABI
- CommunityContestCollection ABI
- DCLLaunchCollection ABI
- DCGCollection ABI
💡 Tip: To clearly see the functions exposed by a contract, open it in abitopic.io . Just paste the contract address there and open the functions tab to see the full list of supported functions and their arguments. You can even test calling the functions with different parameters via the webpage.
Configuring TypeScript to be able to import from a JSON file has its difficulties. The recommended easier workaround is to change the ABI.JSON file’s extension to .ts and modifying it slightly so that it its content starts with export default.
For example, if the ABI file’s contents starts with [{"constant":true,"inputs":[{"internalType":"bytes4" ...etc, modify it so that it starts with export default [{"constant":true,"inputs":[{"internalType":"bytes4" ...etc.
Instance a contract #
After importing the eth-connect library and a contract’s abi, you must instance several objects that will allow you to use the functions in the contract and connect to Metamask in the player’s browser.
You must also import the web3 provider. This is because Metamask in the player’s browser uses web3, so we need a way to interact with that.
import { RequestManager, ContractFactory } from 'eth-connect'
import { abi } from '../contracts/mana'
import { getProvider } from '@decentraland/web3-provider'

executeTask(async () => {
	// create an instance of the web3 provider to interface with Metamask
	const provider = await getProvider()
	// Create the object that will handle the sending and receiving of RPC messages
	const requestManager = new RequestManager(provider)
	// Create a factory object based on the abi
	const factory = new ContractFactory(requestManager, abi)
	// Use the factory object to instance a `contract` object, referencing a specific contract
	const contract = (await factory.at(
		'0x2a8fd99c19271f4f04b1b7b9c4f7cf264b626edb'
	)) as any
})
Note that several of these functions must be called using await, since they rely on fetching external data and can take some time to be completed.
💡 Tip: For contracts that follow a same standard, such as ERC20 or ERC721, you can import a single generic ABI for all. You then generate a single ContractFactory object with that ABI and use that same factory to instance interfaces for each contract.
Call the methods in a contract #
Once you’ve created a contract object, you can easily call the functions that are defined in its ABI, passing it the specified input parameters.
import { getProvider } from '@decentraland/web3-provider'
import { getUserAccount } from '@decentraland/EthereumController'
import { RequestManager, ContractFactory } from 'eth-connect'
import { abi } from '../contracts/mana'

executeTask(async () => {
	try {
		// Setup steps explained in the section above
		const provider = await getProvider()
		const requestManager = new RequestManager(provider)
		const factory = new ContractFactory(requestManager, abi)
		const contract = (await factory.at(
			'0x2a8fd99c19271f4f04b1b7b9c4f7cf264b626edb'
		)) as any
		const address = await getUserAccount()
		log(address)

		// Perform a function from the contract
		const res = await contract.setBalance(
			'0xaFA48Fad27C7cAB28dC6E970E4BFda7F7c8D60Fb',
			100,
			{
				from: address,
			}
		)
		// Log response
		log(res)
	} catch (error) {
		log(error.toString())
	}
})
The example above uses the abi for the Ropsten MANA contract and transfers 100 fake MANA to your account in the Ropsten test network.
Other functions #
The eth-connect library includes a number of other helpers you can use. For example to:
- Get an estimated gas price
- Get the balance of a given address
- Get a transaction receipt
- Get the number of transactions sent from an address
- Convert between various formats including hexadecimal, binary, utf8, etc.
Using the Ethereum test network #
While testing your scene, to avoid transferring real MANA currency, you can use the Ethereum Goerli test network and transfer fake MANA instead.
To use the test network you must set your Metamask Chrome extension to use the Goerli test network instead of Main network.
You must acquire Goerli Ether, which you can obtain for free from various external faucets like this one .
If your transactions also involve MANA, you can also obtain free Goerli MANA from our Goerli MANA faucet .
💡 Tip: To run the transaction of transferring Goerli MANA to your wallet, you will need to pay a gas fee in Goerli Ether.
To preview your scene using the test network, add the DEBUG property to the URL you’re using to access the scene preview on your browser. For example, if you’re accessing the scene via http://127.0.0.1:8000/?position=0%2C-1, you should set the URL to http://127.0.0.1:8000/?DEBUG&position=0%2C-1.
Any transactions that you accept while viewing the scene in this mode will only occur in the test network and not affect the MANA balance in your real wallet.
If you need to test transactions in the Polygon Testnet and need to have MANA on that testnet, you’ll need to swap MANA to that network after acquiring it in Goerli. To bridge Goerli MANA to the Polygon Testnet, visit your Decentraland account page in Goerli and click on ‘swap’ on the Ethereum MANA side.
Send custom RPC messages #
Use the function sendAsync() to send messages over
RPC protocol
.
import * as EthereumController from '@decentraland/EthereumController'

// send a message
await eth!.sendAsync(myMessage)