Coding essentials
The development tools #
At a very high level, the Decentraland Software Development Kit (SDK) allows you to do the following:
- Generate a default project containing a Decentraland scene, including all the assets needed to render and run your content.
- Build, test, and preview the content of your scene locally in your web browser - completely offline, and without having to make any Ethereum transactions or own LAND.
- Write TypeScript code using the Decentraland API to add interactive and dynamic behavior to the scene.
- Upload the content of your scene to the content server.
- Link your LAND tokens to the URL of the content you have uploaded.
Our SDK includes the following:
- The Creator Hub: A standalone application that, amongst other things, lets you create scenes with an easy drag-and-drop interface. You can run previews, debug, edit code, and publish. Read more
- The Decentraland ECS: A TypeScript package containing the framework of helper methods that allows you to create interactive experiences. Use it to create and manipulate objects in the scene and also to facilitate in-world transactions between players or other applications. ( latest ECS reference )
- Scene examples: Take inspiration and coding best practices from the scene examples .
Other legacy tools:
- The Web Editor: A web based too for creating simple scenes and publishing them.
Requirements #
To develop a scene locally, you don’t need to own LAND tokens. Developing and testing a scene can be done completely offline, without the need to deploy a scene to the Ethereum network (the system Decentraland uses to establish ownership of LAND, of a Decentraland Name), or the content server.
You must have:
- The Creator Hub: A standalone application that, amongst other things, lets you create scenes with an easy drag-and-drop interface. You can run previews, debug, edit code, and publish. Read more .
If you plan to edit the scene’s code, you’ll also need to install one of the following:
-
 Visual Studio Code: Download it
here
. It helps you write code a lot faster and with less errors. A source code editor marks syntax errors, autocompletes while you write and even shows you smart suggestions that depend on the context that you’re in. You can also click on an object in the code to see the full definition of its class and what attributes it supports.
 -
 Cursor AI: Download it
here
. A powerful code editor that is integrated with AI. It lets you pick different AI models to help you write code, all of them are free. The AI assistant doesn’t just autocomplete as you write, you can also prompt it to refactor a large code base, write documentation, and more.
Supported languages and syntax #
Decentraland employs TypeScript (.ts) as the default language for writing scenes.
TypeScript is a superset of JavaScript, so if you’re familiar with JavaScript you’ll find it’s almost the same, but TypeScript includes type declarations. Thanks to type declarations, it’s possible to have features like autocomplete better debugging hints, these speed up development times and allow for the creation of a more solid codebase. These features are all key components to a positive developer experience.
When a scene is built, the Typescript code you wrote is compiled into minified Javascript, to make it lighter. The original source code in Typescript is never uploaded to the servers, only the compiled Javascript version.
Other languages #
You can use another tool or language instead of TypeScript and compile it into JavaScript, as long as your compiled scripts are contained within a single JavaScript file named game.js. All provided type declarations are made in TypeScript, and other languages and transpilers are not officially supported.
Scenes #
The content you deploy to your LAND is called a scene. A scene is an interactive program that renders 3D content, this could be a game, an interactive experience, an art gallery, whatever you want!
Scenes are deployed to virtual LAND in Decentraland. LAND is a scarce and non-fungible asset maintained in an Ethereum smart contract. Deploy to a single parcel, a 16 meter by 16 meter plot of LAND, or to multiple adjacent parcels.
When players visit Decentraland, they download and render the content of each scene as they walk through the map. They unload scenes as they walk away from them.
You can also run a scene locally on your machine by running a preview from the CLI.
Entities and Components #
Three dimensional scenes in Decentraland are based on an Entity-Component-System architecture, where everything in a scene is an entity. Entities have components, each component gives the entity it belongs to specific properties. A door entity is likely to have at least a Transform component (that sets position, rotation & scale) and another to provide it a shape. Components are just a place to store data, they don’t carry out any actions by themselves.
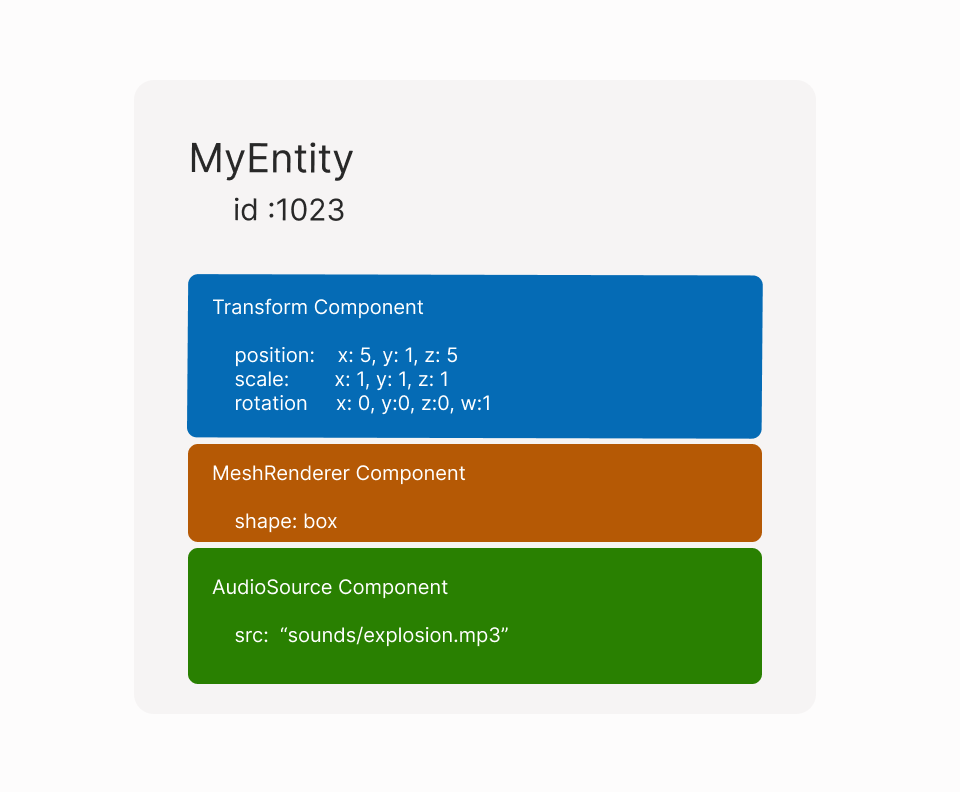
export function main() {
	// Create an entity
	const door = engine.addEntity()

	// Give the entity a position via a transform component
	Transform.create(door, {
		position: Vector3.create(5, 1, 5),
	})

	// Give the entity a visible shape via a GltfContainer component
	GltfContainer.create(door)
}
Entities may be nested inside other entities to form a tree structure. If you’re familiar with web development, you might find it useful to think of entities as elements in a DOM tree and of components as the attributes of each of these elements.
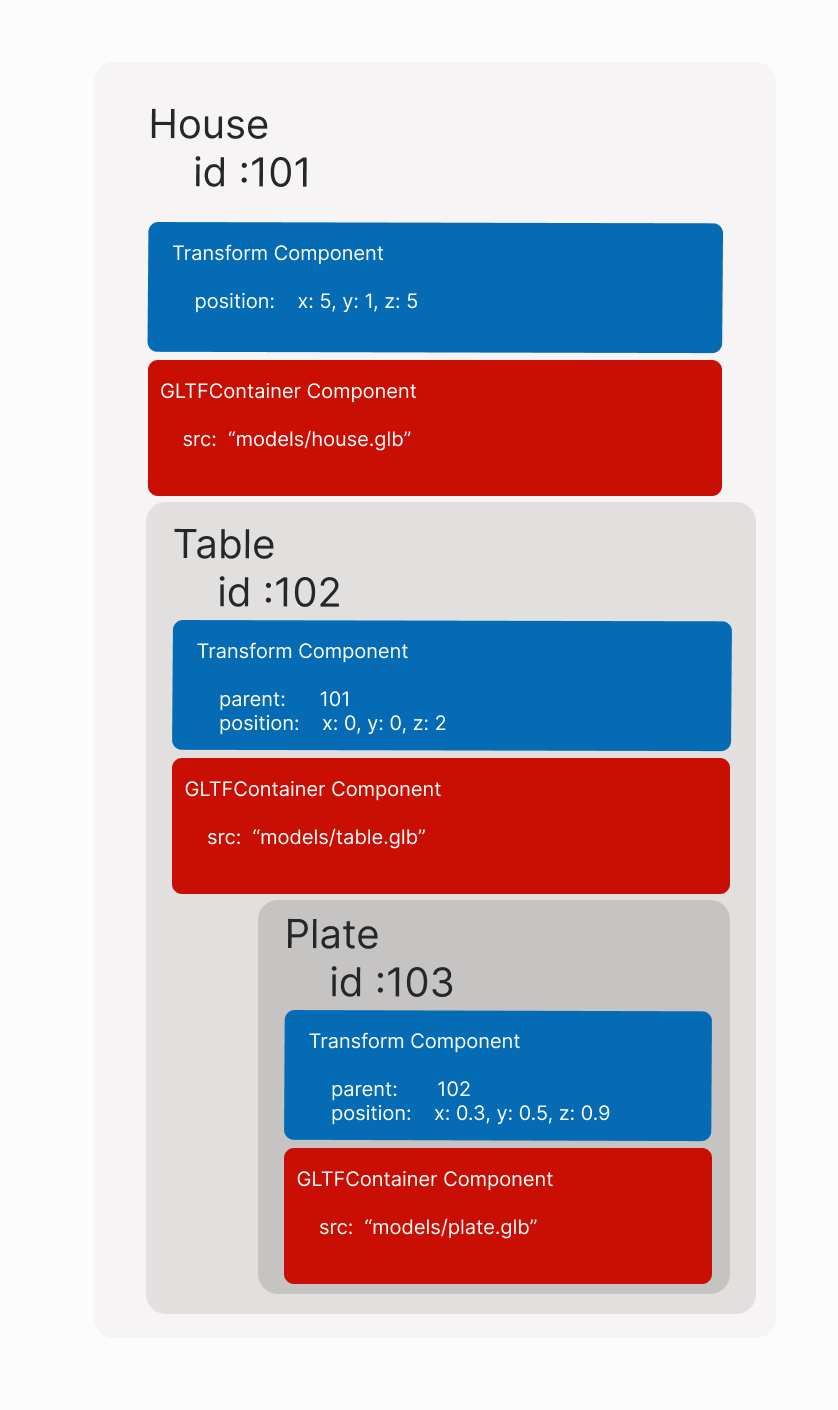
Entities are an abstract concept. An entity is just an id, that is used as a reference to group different components.
See Entities and components for an in-depth look of both these concepts and how they’re used by Decentraland scenes.
Custom components #
The default set of components (like Transform, GltfContainer, Material, etc) are interpreted by the engine and have direct consequences on how the entity will look, its position, if it emits sounds, etc.
You can also define custom components to store data that might be useful to the mechanics in your scene. The engine won’t know how to interpret what the values on these components mean, they won’t have any direct consequences on how the scene is rendered. However, you can write logic in your scene’s code to monitor these values and respond to them. For example, you can define a custom “doorState” component to track the door’s open/closed state. In this case, the component is nothing more than a place to store a value that keeps track of this state. To see the door open and close in your scene, you have to then separately implement the logic that uses these values to affect the door’s rotation, a value from the Transform component that the engine does know how to interpret.
See Custom Components for more information.
Fetch entities by name #
The entities added by dragging and dropping on the Scene Editor can also be accessed via code to further edit them and add behavior.
Use engine.getEntityOrNullByName() to fetch an entity, passing the name assigned to the entity on the Scene Editor UI. Each should have a unique name.
function main() {
	const door = engine.getEntityOrNullByName('door3')
}
You can then do anything you want with that entity, like add new components, modify its existing components, duplicate it or delete it.
See Get entity by name for more information.
If the entity is a Smart item , you can also call its Actions or subscribe to its Triggers via code. See Reference Items .
Systems #
Entities and components are places to store information about the objects in a scene. Systems hold functions that change the information that’s stored in components over time.
Systems are where we implement game logic, they carry out the actions that need to be updated or checked periodically on every tick of the game loop.
A system is a pure and simple function that gets called once on every tick (up to 30 times a second), following the update pattern .
// Basic system
function mySystem() {
	console.log('my system is running')
}

engine.addSystem(mySystem)

// System with dt
function mySystemDT(dt: number) {
	console.log('time since last frame:  ', dt)
}

engine.addSystem(mySystemDT)
A single scene can have 0 or many systems running at the same time. Systems can be turned on or off at different moments during the scene’s duration. It’s generally a good practice to keep independent behaviors in separate systems.
See Systems for more details about how systems are used in a scene.
The game loop #
The game loop is the backbone of a Decentraland scene’s code. It cycles through part of the code at a regular interval and does the following:
- Listen for player input
- Update the scene
- Re-render the scene
In most traditional software programs, all events are triggered directly by player actions. Nothing in the program’s state will change until the player clicks on a button, opens a menu, etc.
But interactive environments and games are different from that. Not all changes to the scene are necessarily caused by a player’s actions. Your scene could have animated objects that move on their own or even non-player characters that have their own AI. Some player actions might also take multiple ticks to be completed, for example if the opening of a door needs to take a whole second, the door’s rotation must be incrementally updated about 30 times as it moves.
We call each iteration over the loop a tick. Decentraland scenes are rendered at 30 ticks per second, whenever possible. If the machine is struggling to render each tick, it may result in less frequent updates.
In each tick, the scene is updated; then the scene is re-rendered, based on the updated values.
In Decentraland scenes, there is no explicitly declared game loop, but rather the Systems of the scene make up the game loop.
The compiling and rendering of the scene is carried out in the backend, you don’t need to handle that while developing your scene.
Querying components #
You can
query components
with the method engine.getEntitiesWith(...components) to keep track of all entities in the scene that have certain components.
It often makes sense to query components within a system , to then loop over each of the returned entities and perform a same set of actions on each.
If you attempt to iterate over all the entities in the scene on every tick of the game loop, that could have a significant cost in performance. By referring only to the entities returned by a query, you ensure you’re only dealing with those that are relevant.
// Define a System
function boxHeightSystem(dt: number) {
	// query for entities that include both MeshRenderer and Transform components
	for (const [entity] of engine.getEntitiesWith(MeshRenderer, Transform)) {
		const transform = Transform.get(entity)
		console.log('a box is at height:  ', transform.position.y)
	}
}

// Add the system to the engine
engine.addSystem(rotationSystem)
Scene lifecycle #
If you start writing loose lines of code directly into index.ts, your code may be lacking some important context. For example, you’ll be missing information about the player entity, or about entities that were added via drag and drop in the Creator Hub. At the time when your lines of code are read, those things aren’t loaded yet.
To avoid that scenario, it’s always recommended to write out your scene’s initial loading code using the main() function (on the index.ts file) as an entrypoint. This function runs only after all of the scene’s initial context is already loaded, this includes anything added via the Scene Editor’s UI.
You can write your code outside the main() function when:
- The code is indirectly called by
main() - The code defines a system, or adds a system to the engine
- The code is inside an async function
📔 Note: By the time the code inside an async function or a system is first executed, everything in the scene is already properly initialized.
Custom Component definitions are an exception, these must always be written outside the
main()function, in a separate file. They need to be interpreted beforemain()is executed.
Mutability #
You can choose to deal with mutable or with immutable (read-only) versions of a component. The .get() function in a component returns an immutable version of the component. You can only read its values, but can’t change any of the properties on it.
The .getMutable() function returns representation of the component that allows you to change its values. Use mutable versions only when you plan to make changes to a component. Dealing with immutable versions of components results in a huge gain in performance.
// fetch an immutable version (read-only)
const immutableTransform = Transform.get(myEntity)

// the following does NOT work:
// 	immutableTransform.position.y = 2

const mutableTransform = Transform.getMutable(myEntity)

// the following DOES change the entity's position
mutableTransform.position.y = 2
See mutable data for more details.
Putting it all together #
The engine is what sits in between entities, and components on one hand and systems on the other.
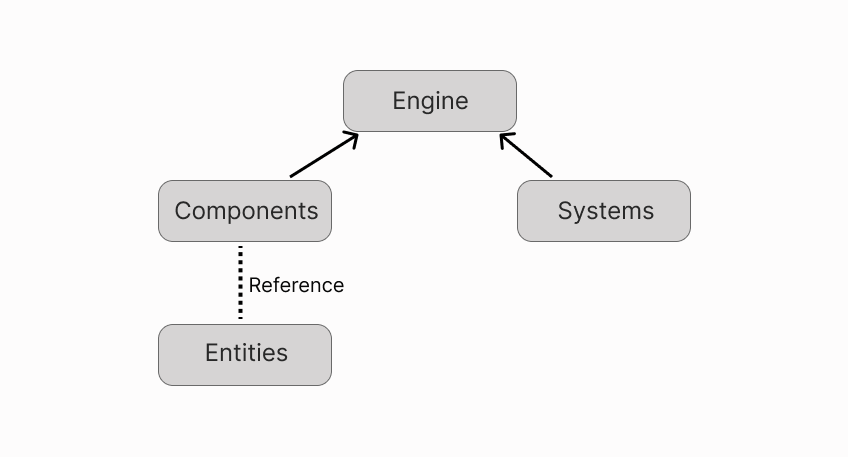
All of the values stored in the components in the scene represent the scene’s state at that point in time. With every tick of the game loop, the engine runs the functions of each of the systems to update the values stored in the components.
After all the systems run, the components on each entity will have new values. When the engine renders the scene, it will use these new updated values and players will see the entities change to match their new states.
export function main() {
	// Create an entity
	const cube = engine.addEntity()

	// Give the entity a position via a transform component
	Transform.create(cube, {
		position: Vector3.create(5, 1, 5),
	})

	// Give the entity a visible shape via a MeshRenderer component
	MeshRenderer.setBox(cube)
}

// Define a System
function rotationSystem(dt: number) {
	// query for entities that include both MeshRenderer and Transform components
	for (const [entity] of engine.getEntitiesWith(MeshRenderer, Transform)) {
		const transform = Transform.getMutable(entity)
		transform.rotation = Quaternion.multiply(
			transform.rotation,
			Quaternion.fromAngleAxis(dt * 10, Vector3.Up())
		)
	}
}

// Add the system to the engine
engine.addSystem(rotationSystem)
In the example above, a cube entity and a rotationSystem system are added to the engine. The cube entity has a Transform, and a MeshRenderer component. In every tick of the game loop, the rotationSystem system is called, and it changes the rotation values in the Transform component of the cube entity.
Note that most of the code above is executed just once, when loading the scene. The exception is the rotationSystem system, which is called on every tick of the game loop.
Scene Decoupling #
Your scenes don’t run in the same context as the engine (a.k.a. the main thread). We created the SDK in a way that is entirely decoupled from the rendering engine. We designed it to be like this for both safety and performance reasons.
Because of this decoupling, your scene’s code doesn’t have access to the DOM or the window object, so you can’t access data like the player’s browser or geographical location.
The decoupling works by using RPC protocol, this protocol assigns a small part of the client to only render the scene and control events.
We have also abstracted the communication protocol. This allows us to run the scenes locally in a WebWorker.
We don’t want developers to intervene with the internals of the engine or even need to know what lies inside the engine. We need to ensure a consistent experience for players throughout the Decentraland map, and mistakes are more likely to happen at that “low” level.
This decoupling is also important to prevent neighbor scenes from interfering with the experience of players while they’re on someone else’s scene. A player might have multiple nearby scenes loaded at the same time, each running their own code. Some actions (like opening external links, or moving the player) are only permitted when the player is standing on that particular scene, not if the scene is loaded but the player is outside.
Tree Shaking #
When converting the source code in TypeScript to the compiled code in minified JavaScript, the process performs tree shaking to ensure that only the parts of the code that are actually being used get converted. This helps keep the scene’s final code as lightweight as possible. It’s especially useful when using external libraries, since often these libraries include a lot of functionality that is not used that would otherwise bulk up the scene.
As a consequence of tree shaking, any code that you want your scene to run needs to be referenced one way or another by the entry points of your code: the main() function on index.ts. Systems can also alternatively be added to the engine on the index.ts file, without referencing main(). Any code that is not explicitly or indirectly referenced by these files, will not make it into the scene.
For example, suppose you have a file named extraContent.ts with the following content, the entity will not be rendered and the system will not start running:
// extraContent.ts

const myEntity = engine.addEntity()
Transform.create(myEntity, {
	position: { x: 8, y: 0, z: 8 },
})
MeshRenderer.setBox(myEntity)

function mySystem(dt: number) {
	console.log('system running')
}

engine.addSystem(mySystem)
To make it run as part of your scene, you can reference from index.ts in the following way:
// on extraContent.ts

export function addEntities() {
	const myEntity = engine.addEntity()
	Transform.create(myEntity, {
		position: { x: 8, y: 0, z: 8 },
	})
	MeshRenderer.setBox(myEntity)
}

export function mySystem(dt: number) {
	console.log('system running')
}

/////////////////////////////

// on index.ts

import { addEntities, mySystem } from '/extraContent'

export function main() {
	addEntities()
}

engine.addSystem(mySystem)
The exception to this rule are the definitions of custom components. These must not be accessed via the main() function entry point, as they need to be interpreted before everything else.
Imports #
All functions, objects, components and other elements used by the scene must be imported into each file to use them. This is a consequence of tree-shaking , as it avoids packaging the entire SDK and instead only includes the parts the scene uses.
Snippets throughout the documentation omit the import lines at the start of every file to keep them clean, but for them to work you must add them to the scene.
When Using VS Studio Code to write your scenes, the smart auto-complete options should take care of handling imports for you when you write, without you having to be aware of this.
When you paste a snippet into your scene, however, you will likely see some elements marked in red, which are not imported into that file. To fix this:
- Click on each underlined word
- Click on the light-bulb icon on the left of the line
- Select Add Import From
- An import line appears at the start of the file.
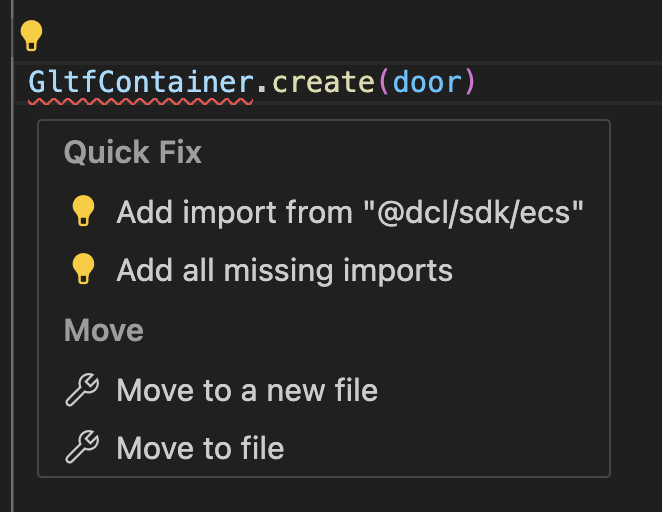
If there are many different things to import, you can also select Add all missing imports from the same dropdown.
Note that imports must be made to every file where an element is used.
VS Studio Code should be able to resolve the correct paths to your imports on its own. If for whatever reason its having trouble doing that, a trick is to paste the following empty import statements at the start of your file. VS Studio should be able to take it from there.
import {} from '@dcl/sdk/ecs'
import {} from '@dcl/sdk/math'
SDK Versions #
When developing a new scene, you use the @latest stable SDK release by default.
You can install the @next SDK release if you want to leverage or preview upcoming features that didn’t yet make it into the latest stable release.
To do so, open the package.json file of your scene, and change the following lines:
  "devDependencies": {
    "@dcl/js-runtime": "next",
    "@dcl/sdk": "next"
  },
Then run the following command on your scene project’s folder:
´´´ npm i ´´´
See manage dependencies for more details.
📔 Note: Keep in mind that the @next version might suffer issues from time to time. The syntax and name of new features might change before it’s released in a stable version.