Animations
Animation is the art of bringing life into things. And there’s no better way to make you scene more lively then adding some animations to your 3D models.
There are a couple ways to do it though: through object animation or through a rig (skeletal animation).
Object animation is best for simple models, such as a bouncing ball, a spinning globe or a floating chair and it doesn’t need an armature. It’s important to mention that object animation is different from vertex animation. In object animation, the model will be animated as a whole, while in vertex animation, as the name says, each vertex of the object can be animated separately (which is super helpful for creating shape keys, for example). While object animation is perfectly fine to use, vertex animation is currently not supported by Decentraland’s engine.
If you have a more complex model, such as a person, creature or machinery, then you’ll need a rig. A rig is nothing more than a digital skeleton that will move and deform the mesh. The process of binding the mesh to the skeleton is called Skinning, where you define which bone will affect each vertex group and how strong that influence is going be, making sure the model deforms in the best way possible.
For either method, though, all animations of a 3D model must be embedded inside its glTF file since you can’t reference animations in separate files.
Creating An Animation #
This is how you create animations using Blender.
Object Animation #
- Make sure you have the Dope Sheet > Action Editor tab open and click on New to add an animation clip.
- Rename it as you see fit and make sure to toggle Fake User (the shield icon) so your animation is saved.
- Set a keyframe in the first frame by selecting the object and pressing I. Then move the object around, rotate or scale it and, in another frame in the timeline, press I again to set another keyframe with the current transforms.
- The final frame of the animation should be the same as the first one, so just copy the first frame and paste it on the last.
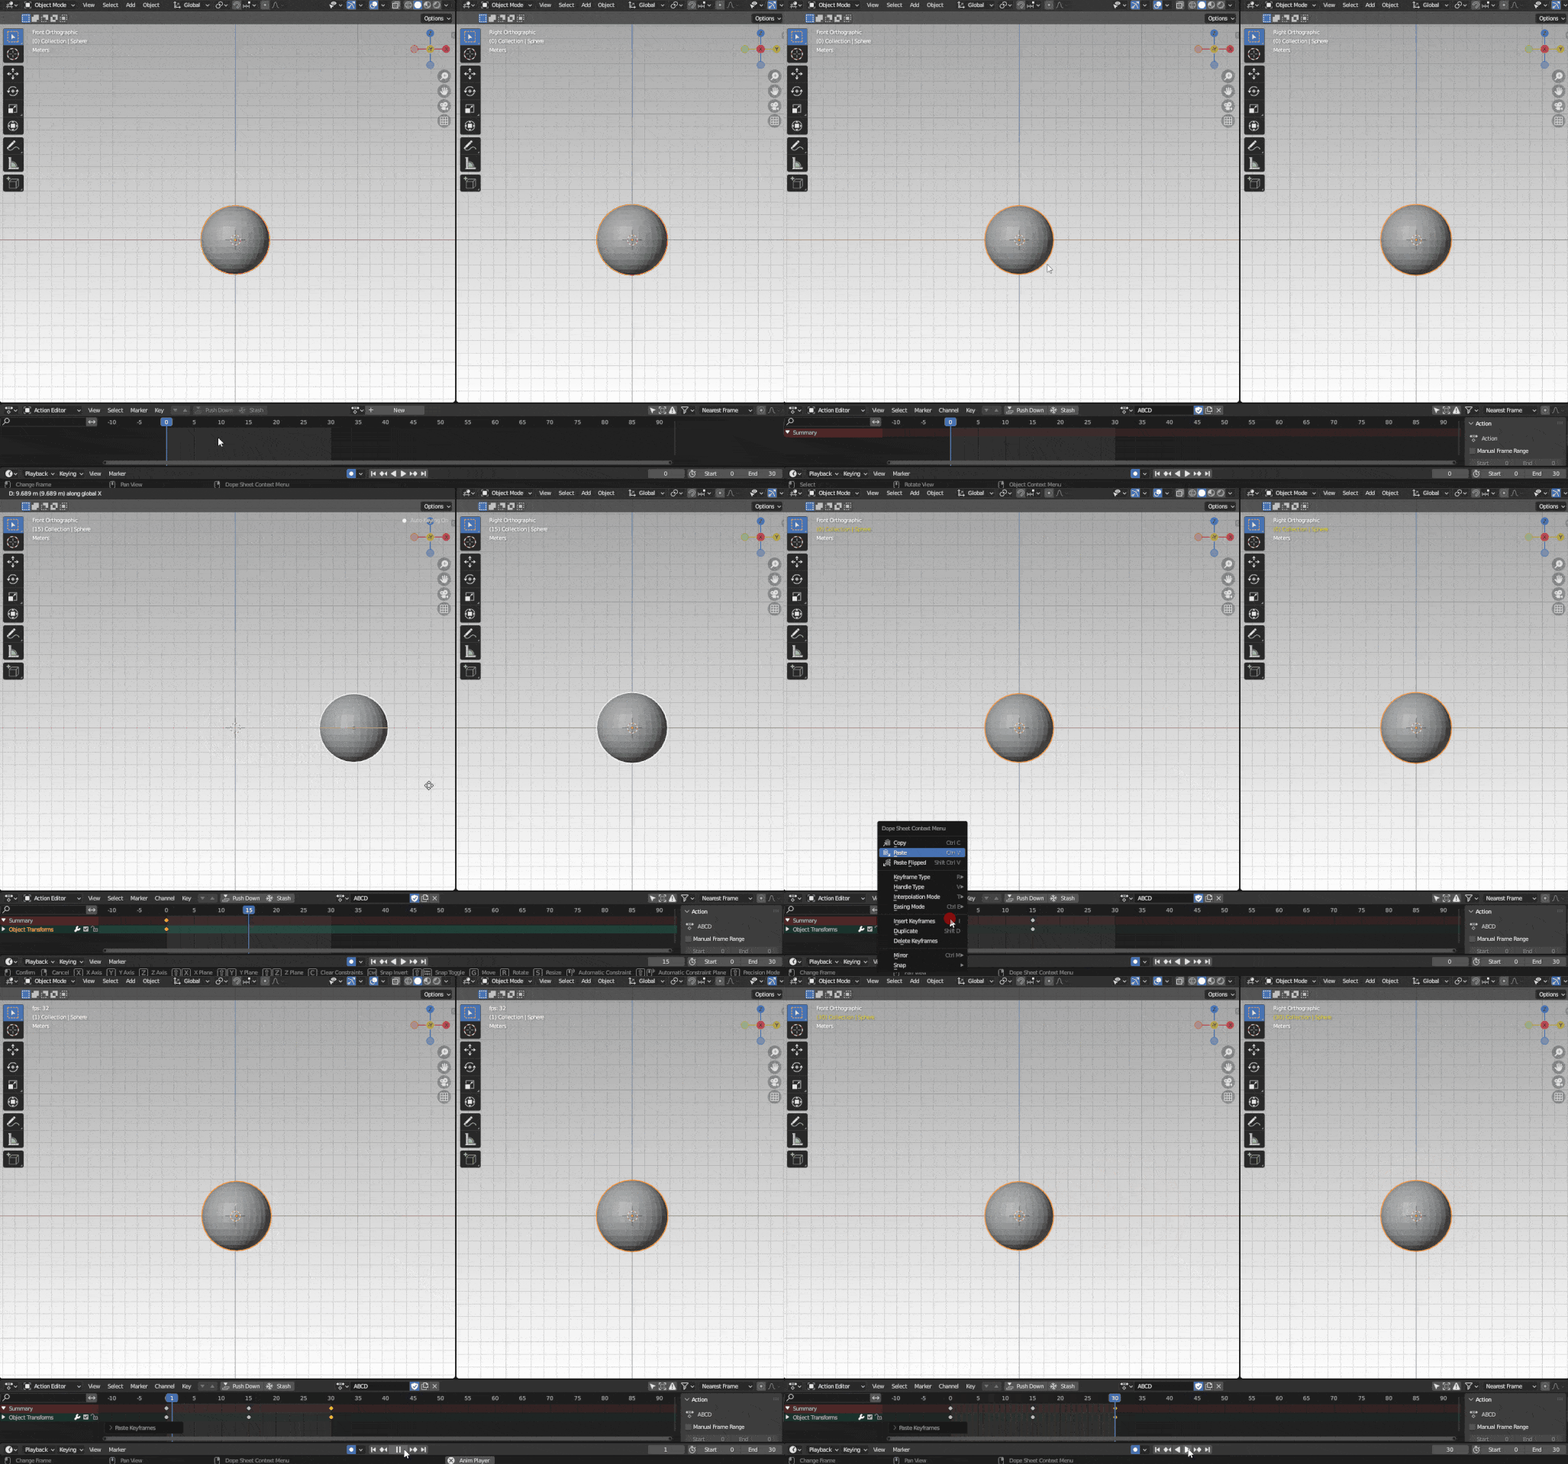
Creating an animation clip and adding keyframes.
Rig Animation #
For a rig animation, you’ll need an armature. If you want to do it yourself, see Create a Rig for instructions on how to set up a consistent armature.
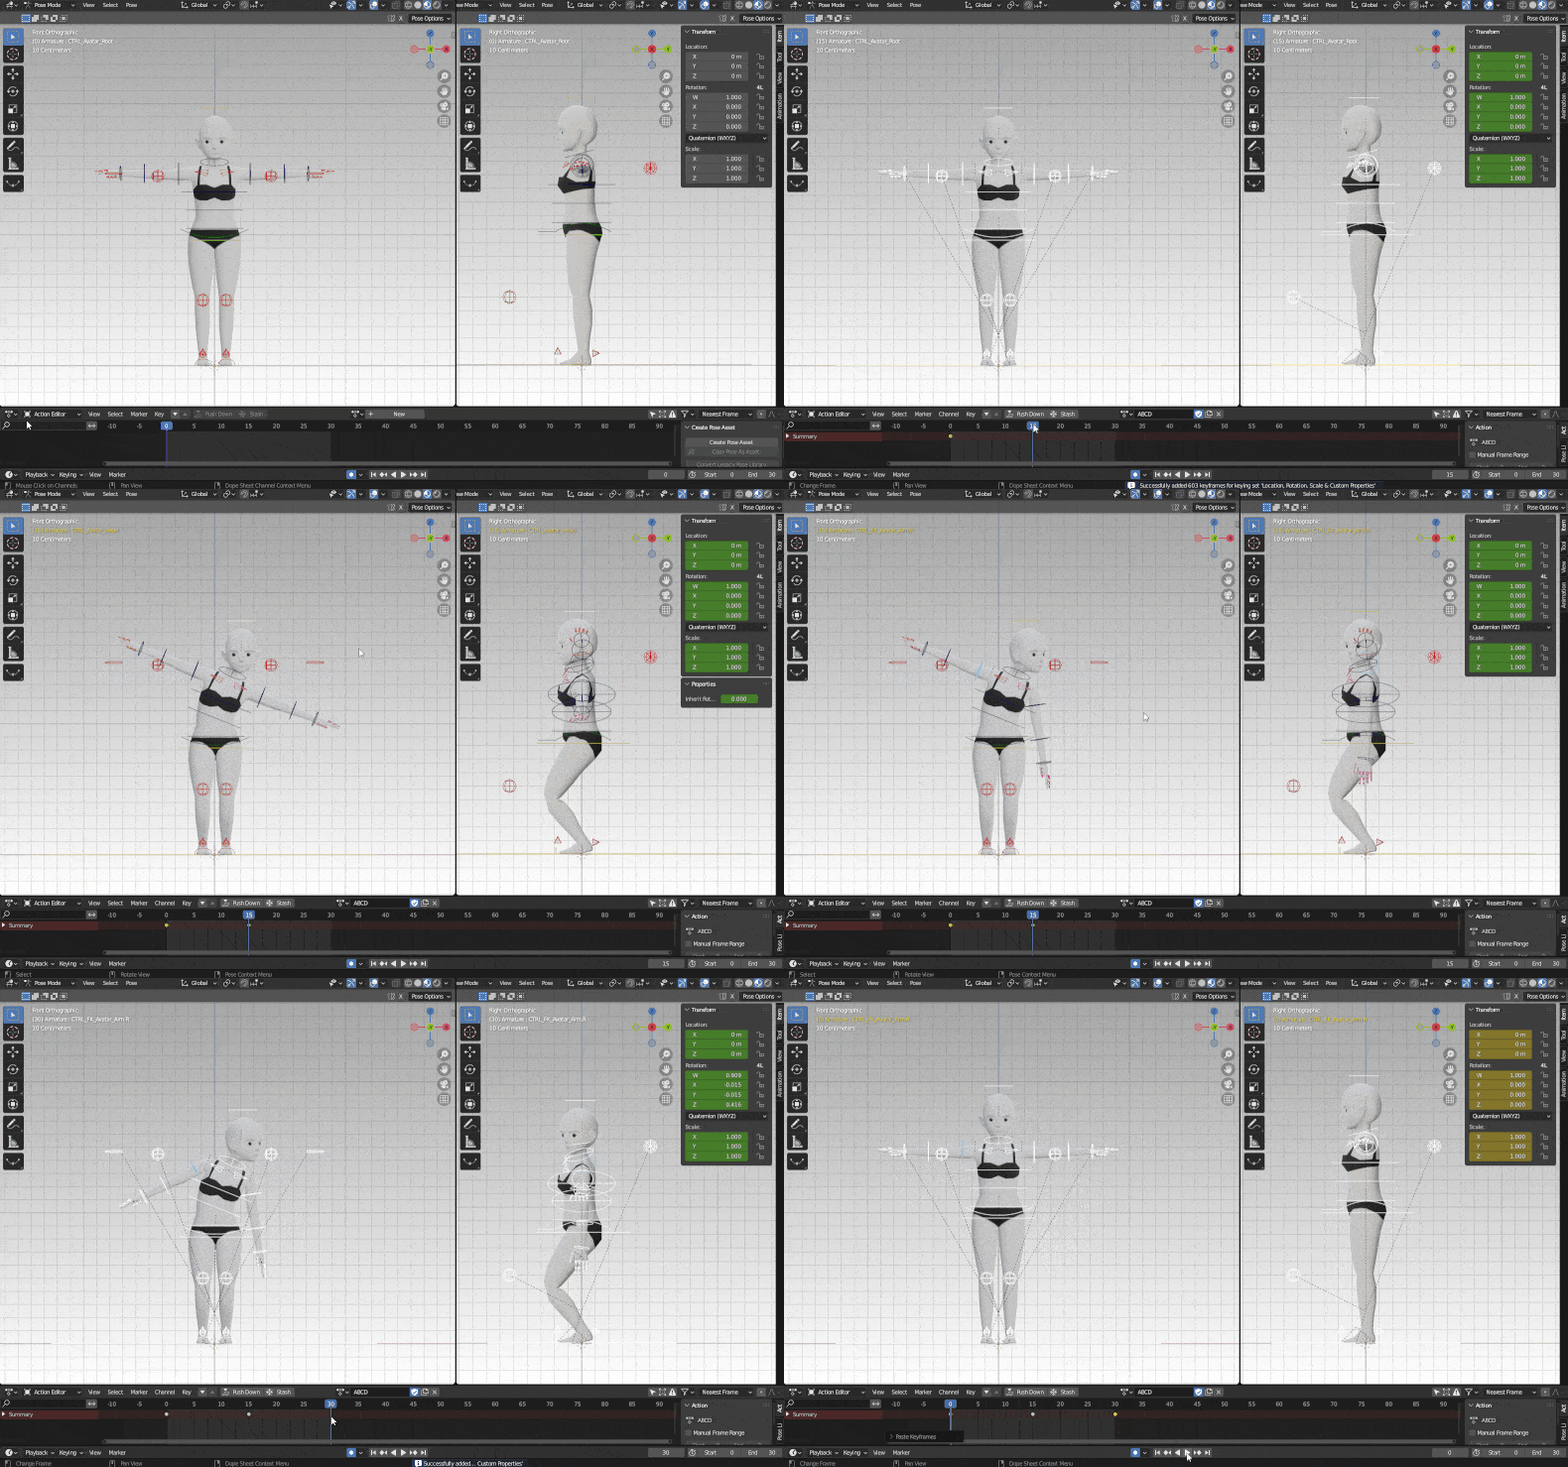
When the rigging is done and skinning has nice deformations, you’re ready to start your animation! The process is very similar to Object Animation, but instead of doing it in Object Mode, you will animate it in Pose Mode.
- Go to Pose Mode and make sure you have the Dope Sheet > Action Editor tab open and click on New to add an animation clip.
- Rename it as you see fit and make sure to toggle Fake User (the shield icon) so your animation is saved.
- With the mouse on the Viewport, Press A to select everything and then I to set a keyframe to the whole armature.
- Move to a different frame in the timeline and manipulate the bone however you like to get the pose you want. You can change a bone’s location, rotation and scale depending on how you set your rig up.
- When you have a nice result, set another keyframe to the whole armature. Keep doing that until you finish your animation. Remember to have the first and last frames the same if the animation is going to loop.
If you’re new to the animation process, check out this tutorial with some nice tips for beginners:
Skinned Animations vs Transform Animations #
Transform animations are typically better than skinned mesh animations for performance because they involve less overhead in terms of computational resources required to display the animation.
Skinned mesh animation involves using a mesh with a skeleton of bones that are weighted to the vertices of the mesh. The skeleton is animated, which in turn animates the mesh. This process can be quite computationally intensive, especially when there are a large number of vertices to animate.
Transform animations, on the other hand, involve animating the transform properties of an object (such as its position, rotation, and scale) directly. This can be done with fewer computational resources than skinned mesh animation, since there are typically fewer transform properties to animate than vertices in a mesh.
Additionally, transform animations can often be pre-calculated and stored in a more compact format, such as keyframe data, which can be quickly accessed and played back without the need for intensive calculations in real-time.
Overall, while skinned mesh animation can produce more detailed and realistic animations, transform animations are often preferred for performance-critical applications such as video games.
Creating and Exporting Multiple Animation Clips #
You can have as many animations clips as you want for you model. You can check on how to create, browse and delete animations in this section here .
In the video below, you will learn how to export multiple animations from Blender in a single GLB file.
Exporting Many Animations as a Single One #
Unlike in a skeletal animation, where you can rig multiple objects and combine their animations in a single animation clip, in object animation you can’t do that. The animations will be exported separately and only one object will play at a time. A solution for that is merging many animations into a single one, so you have an animation clip that has all objects moving at the same time.
To do that, push down to the Nonlinear Animation Track the animation of every object, as shown below.
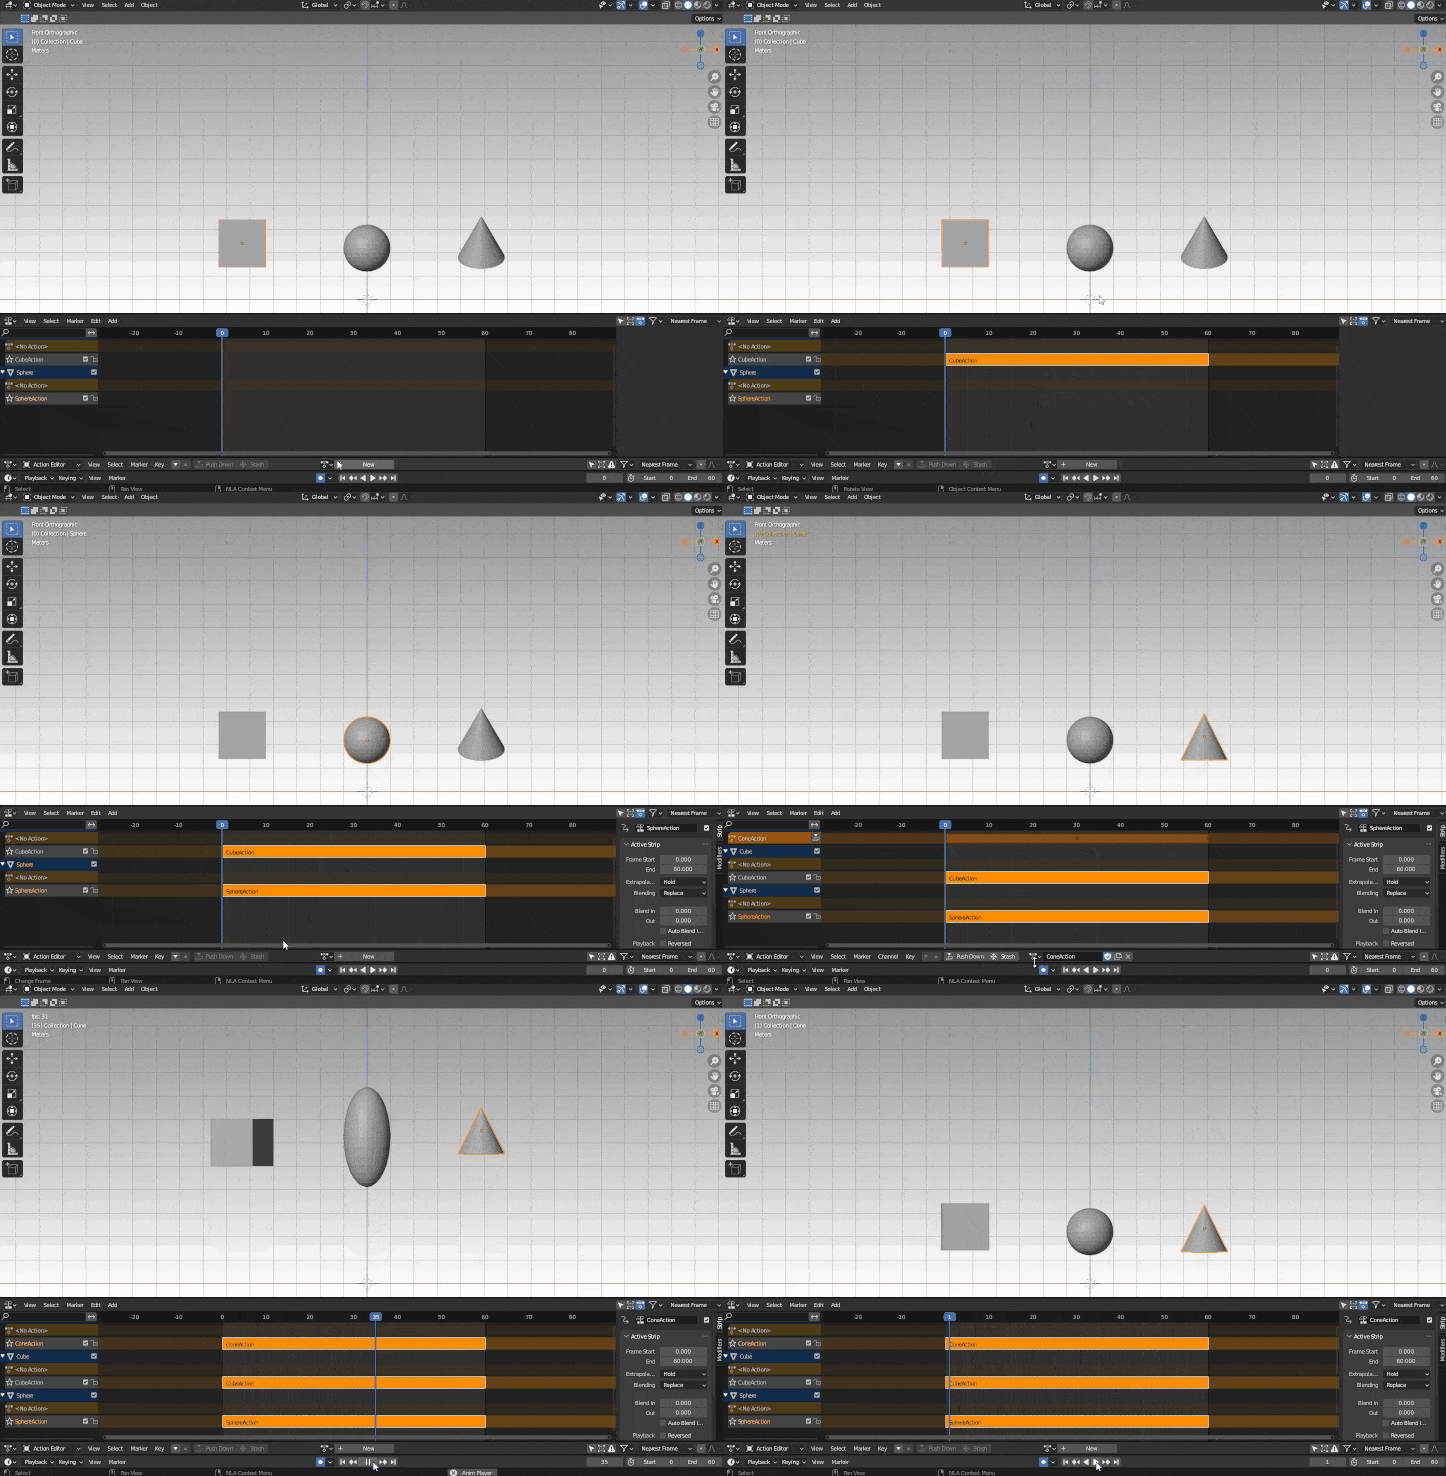
Push down every object’s animation to the NLA Track.
Once all the animations are listed on the NLA Editor, select all the objects, go to File > Export > glTF2.0. Expand Include and check Selected Objects. Expand Animation, expand Animation again and uncheck Group by NLA Track. You can rename the animation clip in Merged Animation Name and then just press Export glTF 2.0.
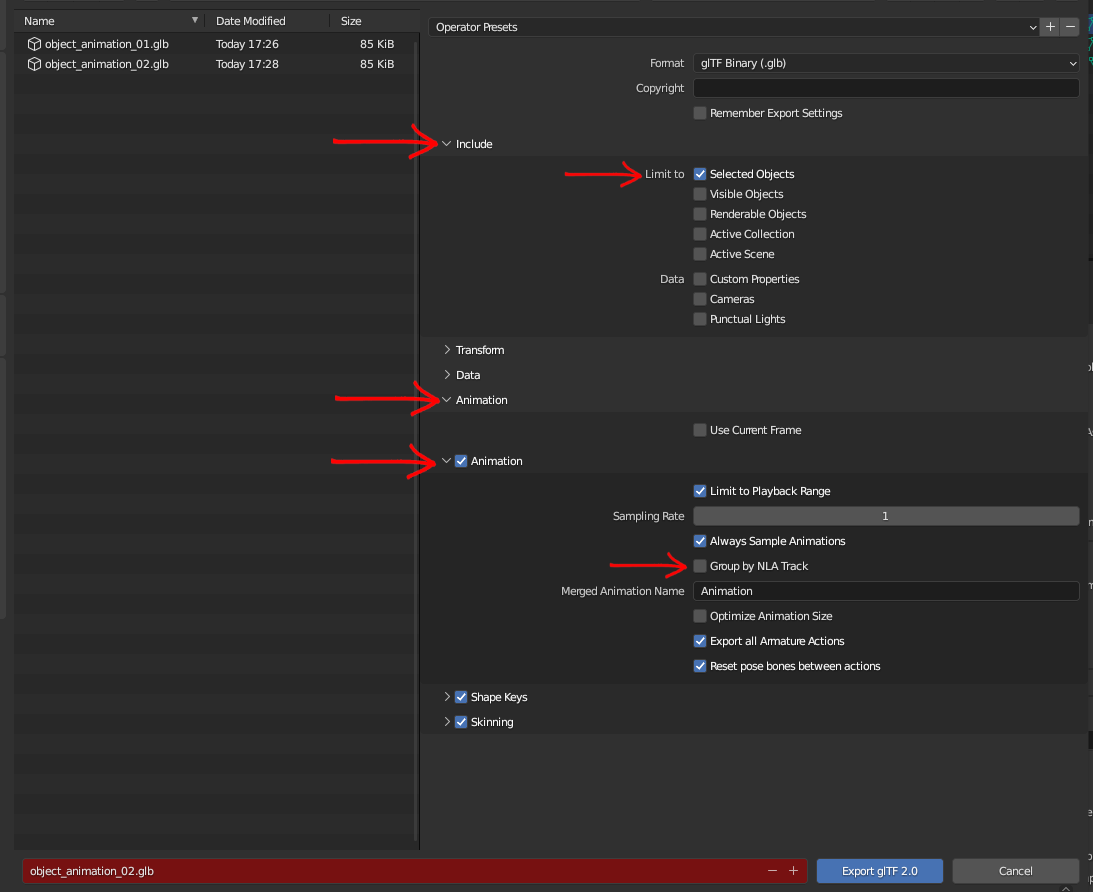
Settings to export multiple animations as a single one.
Keep in mind that this will only work if the objects have a single animation each. If the objects have multiple animation clips, it’s best to export them separately.
💡 Tip: Instead of creating your own animations, you can also download generic animations and apply them to your model. For example, for 3D characters with human-like characteristics, you can download free or paid animations from Mixamo .
Sampling #
Sometimes your animation file might end up being too heavy due to the amount of animations or the combination of animation+model.
Sampling is a good way to optimize the animation. The sampling rate will define how often a keyframe will be baked in the animation. For example, if the sampling rate is set to 2, that means a keyframe will be created at every two frames. A sampling rate of 3 will bake a keyframe every three frames and so on. The higher the sampling rate, the lighter the file.
The drawback, however, is that the animation will start getting less and less fluid since it loses some important keyframes (they are distributed through the animation in an uneven way). It’s also important to notice that sampling is NOT dividing the number of the animation’s frames by the sampling rate.
Usually, a sampling rate of 2 or 3 will do the trick. Those numbers can optimize the animation without compromising the quality.
You can find the Sampling Rate in the export settings, under Animation.
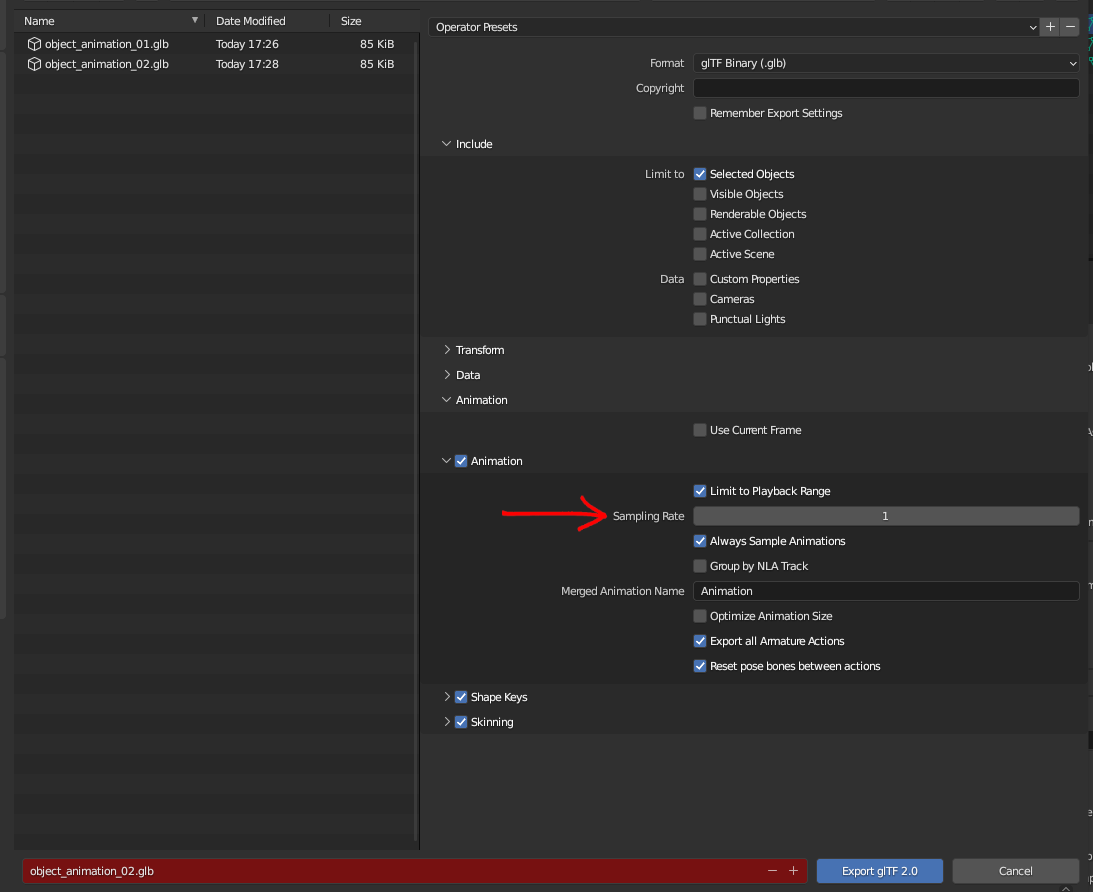
💡 Tip: If the number of frames of the animation can be divided by the sampling rate, that’s a good thing! It means that the final frame will be baked, preserving the transition from end to start of the animation.
Implementing Animations #
This document covers how to add animations into a 3D model. See handle animations for instructions on how to activate and handle animations in a scene.
Best Practices for Animations #
- Keep the armature as simple as possible, only create bones for the parts of the model that you intend to animate. Bones can affect performance, so make sure to only add what’s actually necessary.
- If the animation is going to loop in your scene, make sure the final pose is identical to the starting one for better transition.
- Never leave have a character without animation, even if they aren’t actually doing anything. Create an “idle” animation for when the character is still. The idle can include subtle movements like breathing and perhaps occasional glances.
- Don’t leave bones unposed, like hands, fingers, head or neck. Details are really important in a good animation and stiff movement will only make it less believable.
- Avoid too many keyframes, unless it’s extremely necessary. The more keyframes you add, the higher the chances of getting bad interpolation and a heavier animation.
- Select all your bones (including the deforming ones) and set a keyframe on the first and last frames of your animation. This will avoid having bones with no information, causing one animation to affect the other unintentionally.
- Make sure your file only has one armature when you export it. When importing animations, an armature will also be imported with it. All animations must to be performed by the same base armature, so delete anything that you don’t need.
- Always rename your bones and animations. Keep everything organized!
- When exporting the glTF model, confirm that you’re exporting all the objects and animations. Some exporters will only export the currently selected by default.
- After exporting the model, inspect it in Babylon Sandbox and check if all animations are working and are named as expected.

