Debug in preview
Running a preview provides some useful debugging information and tools to help you understand how the scene is rendered.
If the scene can’t be compiled, you’ll just see the empty ground, with nothing rendered on it. If this occurs, there are several places where you can look for error messages to help you understand what went wrong:
- Check your code editor to make sure that it didn’t mark any syntax or logic errors.
- Check the console in the preview window for any error messages. Open the console by clicking the
 icon on the top-right corner.
 - If you ran the scene using the Creator Hub, check the window with the console output of the scene. If you ran the scene using the CLI, check the output of the command line where you ran
npm run start
💡 Tip: Before you publish your scene to the production environment, publish it to the test environment to try it in a context that is a lot closer to production. See Development Workflow
Use the console #
Open the console by clicking the ![]() icon on the top-right corner.
icon on the top-right corner.
You can also toggle it by pressing the backtick key on your keyboard: **. This key is left of the 1 key on most english language keyboards. Or otherwise press Shift + **\ to open a wider view of the console, in case you need to view more text.
Output messages to console (using console.log()). You can then view these messages as they are generated by opening the scene console.
The console also shows error messages, these are marked in red.
The debug panel #
Open the debug console by clicking the ![]() icon on the top-right corner.
icon on the top-right corner.
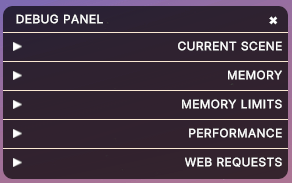
This opens a panel on the lower-right corner with information about the renderer engine, and is updated in real time as things change.

Current scene #
The CURRENT SCENE tab includes information about the scene you’re currently standing on. This includes:
- The number of parcels in the scene
- The maximum height you’re allowed to build at (which is proportional to the number of parcels in the scene)
You can also check the Show Scene Bounds option to see red walls around the scene, which mark the boundaries of the scene.
Memory #
The MEMORY section displays the memory used by Decentraland. Always try to keep this value below the Memory Budget Thresholds. If this value grows too much, it risks crashing the app for players visiting your scene. Keep in mind that in production, the scene might be loaded together with other surrounding scenes and players, which can all contribute to raise the memory consumption higher than what you see in preview.
Performance #
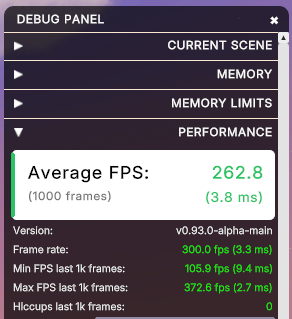
The PERFORMANCE tab includes several fields related to FPS (Frames Per Second). This value will tend to be lower as the scene grows in complexity, make sure you always keep this value above 25 FPS, to ensure a good experience for your players. The FPS will vary depending on the machine you run this in.
The most important value here is the Average FPS, which rounds up the FPS from the last 1000 frames.

📔 Note: The renderer’s FPS is not the same as the scene’s updates of the game loop per second. The scene’s logic is capped at 30 FPS, the renderer’s FPS can go up to 60 or more.
Hiccups refer to momentary pauses in the frame rate, which might have little impact in the overall FPS number but can be very noticeable to the player. These can typically occur when heavy assets are loaded or similar.
Web Requests #
The WEB REQUESTS section allows you to open the Chrome Devtools Network tab, which displays the number of web requests made by the scene and their contents. This is useful to know if the scene is making too many requests to servers, which can impact the performance of the scene.
If your scene interacts with a third party server, it’s often useful to see what data goes in and out. Click Open Chrome Devtools to open a new Chrome window with the Network tab open.
📔 Note: To use this feature, you must first install the Creator Hub , as the necessary dependencies are bundled with that installation.
You don’t need to have the Creator Hub open or run your scene preview via the Creator Hub to use this feature, it can also be used if you’re using the CLI to run your scene preview.
As an alternative, there are several free tools you can run on your machine that report all the data coming in and out of the Decentraland application. For example Charles or Wireshark .
Quick reload #
Whenever you make changes to the scene, the preview reloads and updates automatically, so there’s no need to open and close the preview window.
If you need to reload the scene you’re standing on, click the Reload Scene button on the top-left corner of the preview window.

You can also reload the scene by writing the following into the chat and pushing enter:
/reload
Report a bug #
If you encounter a problem that is not with your scene, but instead with the Decentraland SDK in general, please see Report a bug .
Dependency versions #
Make sure you always use the latest versions of all dependencies in your scene, as any issues you’re experiencing might already be fixed in newer versions. The Creator Hub will notify you when there are updates to install on your Decentraland scene.

You can also manually update the dependenceis via the command line. Running a Decentraland scene locally depends on two main libraries: @dcl/sdk and @dcl/js-runtime, which is installed on each project folder. Make sure both of those are up to date. You can run the following commands to manually update both these libraries to the latest stable version:
npm i @dcl/js-runtime@latest
npm i @dcl/sdk@latest
If your scene uses smart items, it may also be using the @dcl/asset-packs library, which you can update via:
npm i @dcl/asset-packs@latest
If you’re using any of the
utils libraries
make sure those are also up to date, as older versions of these libraries may not be compatible with newer versions of @dcl/sdk.
Lighting conditions #
The in-world time of day has a big impact on how 3d models look. The color of the light source changes subtly, having a bluish tint at night, and a reddish tint during sunrise and sunset. The direction of the light also moves across the sky, casting shadows in different directions.
Check that your scene looks good at all times of day by switching the game clock to different values. Click the skybox time icon on the left panel of the screen to set any time you prefer. If this slider is grayed out, make sure that the Auto option is disabled.

Your 3d model’s materials might not look the same as they did in the modeling tool you created it with. This is to be expected, as all 3d rendering engines have subtle differences in how they deal with light and materials.
You can also set up your scene so that the time of day is fixed and lighting does not change. See Skybox control for more details.
Multiplayer testing #
If you launch a scene preview and open it in two (or more) different explorer windows, each open window will be interpreted as a separate player, and a mock communications server will keep these players in sync.
Interact with the scene on one window, then switch to the other to see that the effects of that interaction are also visible there.
Using the Creator Hub, click the Preview button a second time, and that opens a second Decentraland explorer window. You must connect on both windows with different addresses. The same sessions will remain open as the scene reloads. You may need to log out and log in again to the second window to select a different account.

Both players will see each other, and can interact with each other. If the scene has any multiplayer logic, it will work as expected and get synced between the two players.
As an alternative, you can open a second Decentraland explorer window by writing the following into a browser URL:
decentraland://realm=http://127.0.0.1:8000&local-scene=true&debug=true
Using the Ethereum test network #
While testing your scene, to avoid transferring real MANA or other currencies, you can use the Ethereum Sepolia test network and transfer fake testnet MANA instead.
To use the test network you must set your Metamask Chrome extension to use the Sepolia test network instead of Main network. You must also own MANA in the Sepolia blockchain, which you can acquire for free from Decentraland.
💡 Tip: To run the transaction of transferring Sepolia MANA to your wallet, you will need to pay a gas fee in Sepolia Ether.
Any transactions that you accept while viewing the scene in this mode will only occur in the test network and not affect the MANA balance in your real wallet.
To preview your scene using the test network, paste the following URL into a browser tab. This will open the scene on the Decentraland desktop client:
decentraland://realm=http://127.0.0.1:8000&local-scene=true&debug=true&dclenv=zone&position=0,0
💡 Tip: Change the position parameter to the coordinates of your scene, to load directly into your scene.. Any transactions that you accept while viewing the scene in this mode will only occur in the test network and not affect the MANA balance in your real wallet.
If you need to test transactions in the Polygon Testnet and need to have MANA on that testnet, you’ll need to swap MANA to that network after acquiring it in Sepolia. To bridge Sepolia MANA to the Polygon Testnet, visit your Decentraland account page in Sepolia and click on ‘swap’ on the Ethereum MANA side.