
Smart Items - Advanced
Most smart items have a basic module where you can configure only the most common settings in a simple way, but you can scroll down past the Advanced marker to customize almost anything about how the item behaves.
The following item has a Transform component and a basic module that exposes only the basic fields for configuring a button. But if you scroll down past the Advanced marker, you’ll find all the available settings.
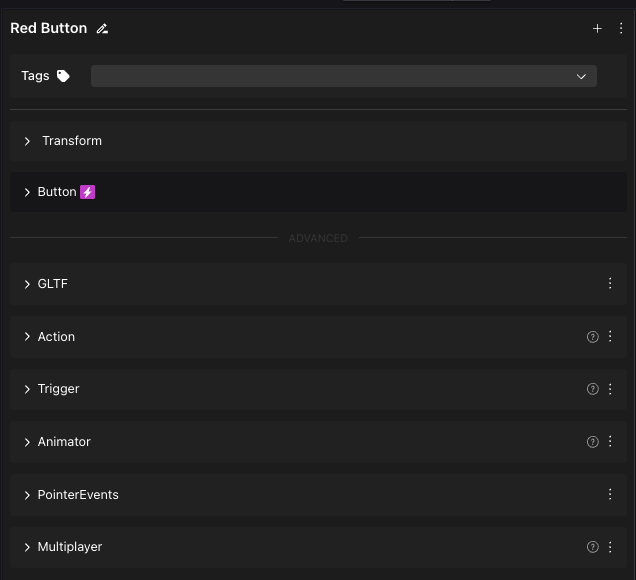
📔 Note: Most of the settings in the basic module are also available in the components lower down. The changes done in the basic module are reflected in the components lower down and vice versa, except for some cases where the basic settings are an abstraction of multiple settings lower down. In those cases, changing the advanced settings to values that are not supported by the basic module will result in the field in the basic module being marked as undefined.
Advanced configuration #
Properties are grouped into components . Different smart items may have different components, depending on their functionality.
The behavior of most items is controlled by:
- Actions : The Actions component defines things that the item can do. For example play a sound, play an animation, move up, or become invisible.
- Triggers : The Triggers component assigns what events make those actions happen. For example when the player clicks on the item, when the player walks into an area, or when the scene first loads.
For example, in a door smart item, the Actions component includes “Open” and “Close” actions. The Triggers component in that item includes an On Click trigger that activates the “Open” action when the door is clicked by the player.
The triggers of a smart item can activate actions on any smart item in the scene, not just on that same smart item. For example, a button smart item can have a Triggers component that activates the “move up” action defined on the Actions component of a floating platform.
Triggers can also happen conditionally. For example, door smart items include two On Click triggers in its Triggers component: one opens the door if that door was closed, the other closes the door if it was open. For more details see States and conditional logic .
Interactions between items #
To make items interact with each other:
- One item needs to have at least one action defined in an Actions component.
- The other item needs a trigger in the Triggers component that points to that action.
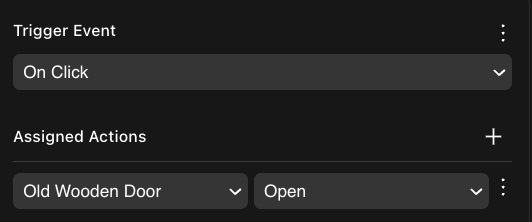
For example, to make a button open a door:
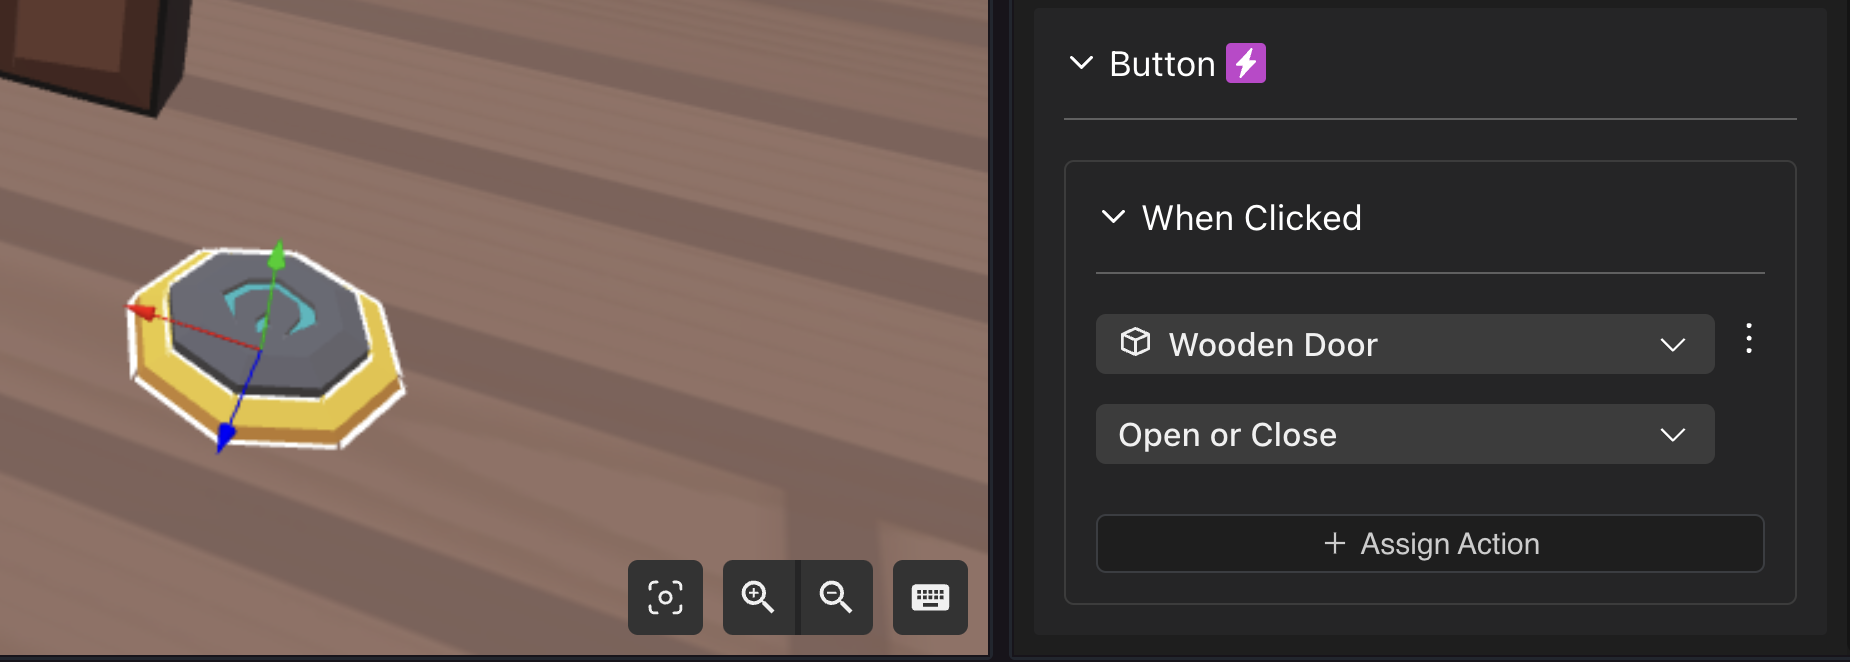
- Add any button smart item, open its Triggers component. It has a default trigger event that plays a sound and an animation for the button itself.
- Click the + sign next to Assigned Actions, to add a third action on that same trigger event.
- Select the smart item for the door on the first dropdown.
- On the second dropdown, select the “Open” action.
💡 Tip: You can instead create a new Trigger event that only handles the door’s action. Both trigger events are called every time the button is clicked.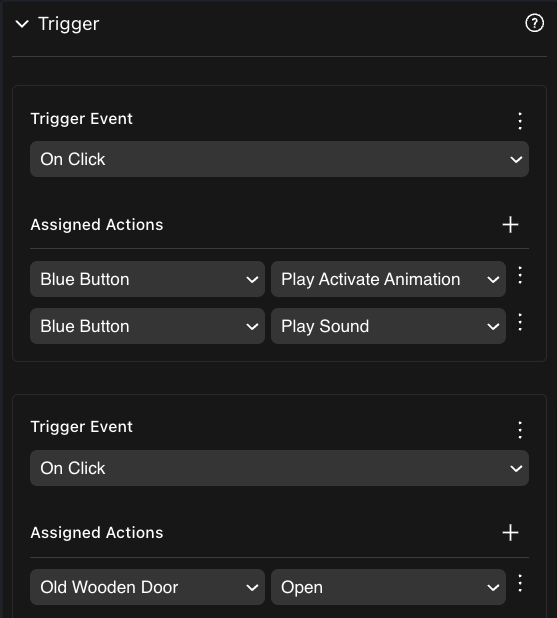
Any item can trigger any action from any other item, as long as the action is defined. See Triggers for more ways in which an action can be triggered.
You can use states and conditional logic to only trigger an action if a condition is met. The condition can even check the state of a third smart item. For example, a button only opens the door if the a custom “power generator” smart item has its state set to “On”.
Actions #
The Actions component lists actions that the item can carry out. Each smart item includes a set of pre-defined actions. You can customize existing actions or add new ones. The following types of actions are available:
- Play Animation: Plays an animation in the 3D model of the item. See About playing animations
- Stop Animation: Stops all animations being played by the 3D model of the item.
- Play Sound: Plays a sound from a file, at the location of the item. See About playing sounds
- Stop Sound: Stops all sounds playing from the item.
- Start Tween: Makes a gradual change in position, rotation or scale over a given period. See Moving, rotating or scaling .
- Set Visibility: Makes the item visible or invisible.
- Attach To Player: Sets the item as a child of the player’s avatar. For example to carry it on their hand or above their head.
- Detach From Player: Detaches the item from the player’s avatar.
- Open Link: Opens a link to an external website.
📔 Note: This action can only happen as a result of clicking on an item. It can’t be triggered by walking into a trigger area.
- Move Player: Change the position of the player to a set of local coordinates inside the scene. It’s only possible to move the player inside the same scene.
- Teleport Player: Teleport a player to the coordinates of another scene in Decentraland. Players will appear in the spawn-point of the destination scene.
- Move Player: Change the player’s position to another position inside the same scene, using coordinates relative to the scene’s origin.
- Play Emote: Make the player’s avatar perform one of the default avatar animations (eg: wave, or clap).
- Play Custom Emote: Make the player’s avatar perform a custom animation, from a file uploaded to the scene.
- Show Text: Display text on the screen’s UI, to be hidden after a few seconds. Ideal hints, dialog lines, notifications, etc.
- Hide Text: Hides any UI text that might be currently displayed.
- Start Delay: Delays another action of the same item by as many seconds as you need.
- Stop Delay: Cancels any delayed actions on the item.
- Start Loop: Replays an action from the same item recurrently at a given interval.
- Stop Loop: Cancels any looped actions on the item.
- Play Video Stream: Play a video as a material on a primitive shape.
- Stop Video Stream: Stop any videos currently played.
- Play Audio Stream: Play an audio stream.
- Stop Audio Stream: Stop any audio streams currently playing.
- Open link: Open a link on browser tab. Players are asked if they trust the domain before they do.
- Clone: Duplicates an item in the designated position.
- Remove: Deletes an item from the scene.
- Show Image: Displays an image on the UI, potentially for a limited time. It can also include caption.
- Hide Image: Hides any image currently displayed in the UI via the Show Image action.
- Damage: Reduces the health on any healthbar that is near. The Layer property can determine if it only acts on helalthbars on the player, or on other items.
- Move player here: Changes the player’s position to that of this item.
- Place on Player: Changes the item’s position to that of the player.
- Rotate as Player: Changes the item’s rotation to that of the player.
- Place on Camera: Changes the item’s position to that of the camera.
- Rotate as Camera: Changes the item’s rotation to that of the camera.
- Set Position: Changes the item’s position to a specific one. It can be absolute or relative to its current position.
- Set Rotation: Changes the item’s rotation to a specific one. It can be absolute or relative to its current rotation.
- Set Scale: Changes the item’s scale to a specific one. It can be absolute or relative to its current scale.
- Follow Player: Starts moving and turning in direction to the player’s position. It ignores any obstacles on the way. You can set the speed and make it only move on certain axis. Min Distance determines how close it will come to the player.
- Stop Following Player: Stops the Follow Player action.
- Random Action: One of the actions listed here will be played at random with equal probablility each time the random action is called. You can list any of the actions that belong to the item.
- Batch Actions: All of the actions listed here will be played simultaneously each time the batch action is called. You can list any of the actions that bleong to the item.
- Heal Player: Restore health to the player’s health bar.
See states and conditional logic to learn about other actions related to logic conditions.
The Actions component defines possible actions, but these don’t do anything in the scene unless they are triggered. Actions are activated by a trigger , either from the same smart item, or from a different one.
To add a new action to an item, click the Add New Action button at the bottom of the Action component. Then give the action a name, select a type, and complete any additional fields specific to the type of action.

Triggers #
The Triggers component defines trigger events, these activate actions when a certain event happens. The following types of trigger events exist:
- On Click: When the player clicks on the item. See About click triggers
- Player Enters Area: When the player enters an area. See About trigger areas
- Player Leaves Area: When the player leaves an area. See About trigger areas
- On Spawn: When the scene starts, or the item is spawned in the scene. See Trigger on spawn
See states and conditional logic to learn about other triggers related to logic conditions.
To add a new trigger, click the Add New Trigger Event at the bottom of the Trigger component. Then select the type of trigger, the entity you want to activate and an action from that entity.

📔 Note: An action needs to be defined in the Actions component of the entity before you can trigger it. Triggers can only affect entities that have an Actions component.
About Playing Animations #
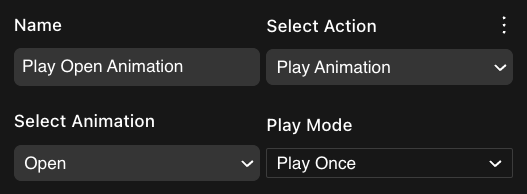
Use an action of type Play Animation to run an animation on the 3D model of the smart item. The animation needs to already exist as part of the 3D model file. The Select Animation dropdown displays a list of all of the available animations in the 3D mode.
The Play Mode field lets you select if an animation should play just once, or if it should keep looping.
Once the action is created, you can activate it via the Triggers component of that same item or of any other item.
Use the Stop Animation action to stop all animations by the item, both looping and non-looping.
💡 Tip: To easily check the contents of a 3D model, to see what animations it includes and what they look like, a good tool is the Babylon Sandbox . Just drag the 3D model file into the window. A dropdown with a list of its animations should appear on the bottom.
To learn more about animations and how you can create your own as part of a 3D model, see Animations .
About Playing sounds #
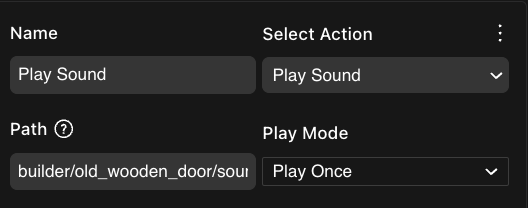
Use an action of type Play Sound to play a sound file. You can play any sound file as long as it’s imported into the scene project. The sound is heard positionally, from the location of the item, meaning they sound louder if the player is closer.
💡 Tip: Instead of typing in the path to the sound file, you can drag it into the Path field from the file navigation menu on the bottom of the Scene Editor.
Use the Play Mode field to chose if playing the sound once, or looping it continuously.
Once the action is created, you can activate it via the Triggers component of that same item or of any other item.
Use the Stop Sound action to stop all sounds by the item, both looping and non-looping. This also stops sounds from the AudioSource component.
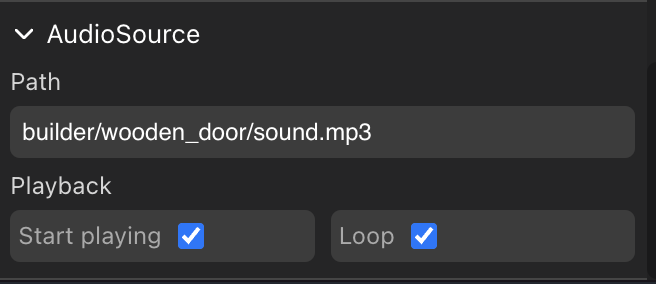
To make an item play a looping sound always, for example for ambience or music, it’s easier to use the AudioSource component, instead of using Actions and Triggers. This component only requires that you provide a path to a file, and check the boxes Start Playing and Loop.
📔 Note: A smart item can only play one sound at a time. Calling a second sound will interrupt any other sounds currently sounding. This also applies to sounds of the AudioSource component. If you need two sounds to sound together, consider adding an invisible entity in the same location to hold a Play Sound action.
See sounds for more about playing sounds in Decentraland.
Moving, rotating, or scaling #
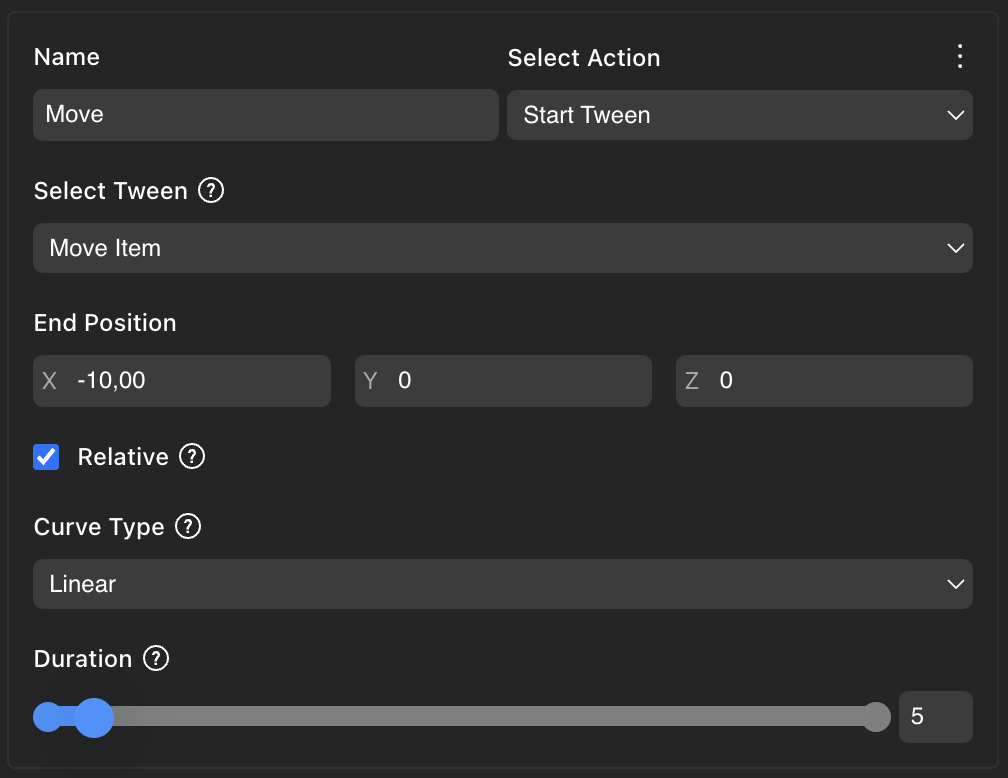
Use a Start Tween action to change the position, scale, or rotation, of the item over a period of time. All Start Tween actions start from the original state of the item, and change to an ending state over a period of time.
Tweens in position can be relative or absolute. An absolute tween in position moves the item to a fixed position in relation to the scene. The item will move from wherever it is to that position. If it’s already there, it won’t appear to move. A relative tween in position moves the item a certain distance from where it is now, for example a tween to a relative position of 1, 0, 0 moves the item 1 meter forward, in the direction it’s currently facing. If you run the tween action a second time, the item will move another meter forward.
Tweens in rotation can also be relative or absolute. A relative rotation is added to the item’s current rotation. An absolute tween in rotation will make the item face a specific direction, relative to the scene.
Use the Duration field to set how long the whole movement should take, in seconds. Note that the slider goes up to 100 seconds, but you can also write a larger number manually if you need to.
Once the action is created, you can activate it via the Triggers component of that same item or of any other item.
Tweens can follow different Curve Types that affect the rate of change over time. A linear curve (default), means that the speed of the change is constant from start to finish. There are plenty of options to chose, that draw differently shaped curves depending on if the beginning and/or end start slow, and how much. An easeinexpo curve starts slow and ends fast, increasing speed exponentially, on the contrary an easeoutexpo curve starts fast and ends slow.
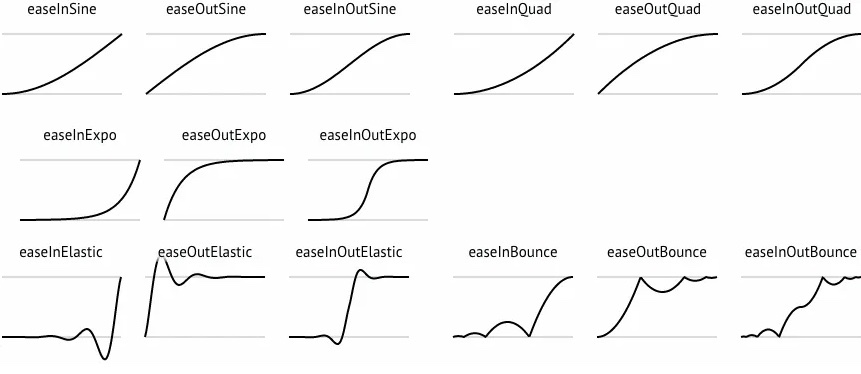
💡 Tip: Experiment with different movement curves. The differences are often subtle, but we subconsciously interpret information from how things move, like weight, friction, or even personality.
Use On Tween End trigger events in the Triggers component to activate an action after a tween has finished. Use states and conditional logic to describe a looping path for a floating platform, so that it constantly moves between two locations.
When an item performs a tween, this affects everything about the item. For example, if it changes scale, it changes the scale of its visible 3D model and also invisible collider geometry, the size of text, etc. If the item has any children (nested in the entity tree on the left), these child entities are also affected by the tween.
📔 Note: Each entity can only perform one tween at a time. For example, you can´t make an item move sideways and also rotate at the same time. As a workaround, you can use parented entities. For example, you can have an invisible parent entity that moves sideways, with a visible child that rotates.
About click triggers #
To trigger an action by clicking on an item, create an On Click trigger. The action will be activated every time that the player clicks on the entity.
See Make any item smart for more details.
📔 Note: When using custom 3D models, the model must have an invisible collider geometry for it to be clickable. See colliders .
As an alternative, you can configure the GLTF component of the item, so that its Visible Layer of collision is set to Pointer.
Another alternative is to add a Click Area smart item, to draw a cube that overlaps the item you want to click. The Click Area smart item is an invisible item .
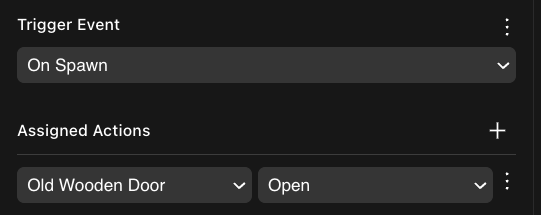
Trigger on spawn #
Triggers of type On Spawn activate an action when the scene is loaded. Instead of waiting for the player to interact with an item, the action runs right away.
For example, use this to make a platform move continually. Use an On Spawn trigger to activate a tween action. Then use On State Change triggers to keep it moving between two or more positions.
Multiplayer #
All smart items are multiplayer by default. See Smart Items - Basic for more details.
You can change or fine-tune this multiplayer behavior to only sync certain components of the item.
In the item’s Multiplayer component, check the boxes for the components you want to share.
For example, a door shares its Animator so all see the opening animations, its AudioSource so all hear its sound, and its State so all keep track of if it’s currently open or closed. The door doesn’t share its Visibility component, because the door is usually always visible. If you include actions to trigger its visibility on and off, you might want to have this component ticked too, so that changes are synced between all players.
Invisible items #
Some items are not meant to be seen by the player, but are visible while editing your scene to make them easier to manage. This is the case for items like Ambience, Trigger Area, Click Area, etc.
In the advanced mode, these items have a Visibility component set to invisible. This component doesn’t affect the visibility of the items on the Scene Editor, but any item set to invisible isn’t seen by players when running a preview.